Monday, April 29, 2013

Happy Together

Hello everyone! It's time for my second post here! I am still so excited to get to create with these awesome products! I wanted to share a layout with some handmade blooms. The two pink blooms were made with the Nesting Dies, and I mixed some regular blooms from my stash in with them. I will share how I made these blooms.

 But first I want to share the completed project. This is a page of our niece on her wedding day! I just love the fun photo capturing the excitement!


Now on to the blooms. I used the Nesting Dies (Daisy) for these blooms. I did two different sizes. You can make them the size you want, you just need 2 smaller and 3 larger. After cutting, use a sponge dabber and ink the center with a little darker ink. Also snip slightly in between each petal Next you will use your piercing tool and make a hole in the center of each. Attach them all together with a brad. Spritz really good with water. Then carefully fold each layer up toward the brad, gathering in the center. Your bloom will look like the one below. Let it dry.


Next, take your piercing tool and carefully pull apart each layer and petal. Just be careful, some sections are bunched up really tightly.

Now, once you have them separated, you can remove the brad, they will look like the ones below:


Now you can layer them and attach with the type of adhesive of your choice. I used a white glue on mine.


Here is a closeup of the finished blooms. You don't need a center, they look more natural left the way they are!


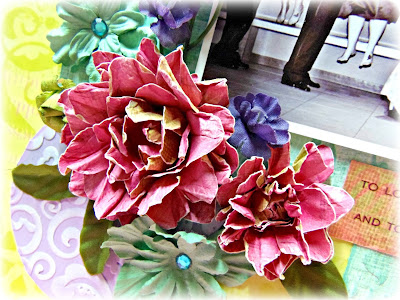
For my background, I embossed two pieces of aqua colored paper with a slight pattern with the Elegance Collection Large Damask Flourish. I also then embossed a solid lavendar paper with the Confetti folder from the Elegance Collection. I cut the lavendar into circles.

Here you see some closeups of the detail of this.


I used the adhesive foam tape to raise up the smaller embossed circles for some added dimension. I really like how the intricate patterns of the embossing folders are so visible, these are great folders!

One more look at the blooms. I hope you have enjoyed this little tip on making blooms. You can play around and get lots of different looks with this technique!!! I appreciate you stopping by!!!

Couture Creations Products used:


Wednesday, April 24, 2013

Berry71Bleu Guest Designer

I was so happy and honored to be asked to Guest Design for Berry71Bleu. I've know Marivic for a while through OnceUponASketch, she has a wonderful challenge blog and does the most GORGEOUS hand made tags!!! You should check it out at Berry71Bleu.

She sent me a beautiful tag to work with, along with some other goodies that were stunning as well! Here is the page that I made.


I used beautiful trim and a floral spray from Marivic also, I just love the coral color!


Here you see more detail of the stunning handmade tag!


The title sticker is Anna Griffin, Inc.


and one more closeup of the florals on this one! You can see a tad bit of the "faux stitching" that I did with my Zig marker too.


Thanks for stopping by, I appreciate each and every visit and comment! I hope you check out Berry71Bleu and join the challenges!

Monday, April 22, 2013

Couture Creations

Here's my post that was shared on the Couture Creations blog yesterday!!!!

Hello everyone! It's Patti here, and this is my first post with Couture Creations. I was so excited to be chosen as part of this team and couldn't wait to get started with the awesome products. I created a page of my sweet little cousin smelling of a Spring gardenia bloom. I wanted a lot of texture on the page, and wanted to use a bright Spring color palette.


I used the 18mmx4m foam mounting tape to mount my photos to give some dimension to the project. This really pops in person! I attached the ribbon and photo mats using the 12mmx50m double sided tape.

I used WorldWin Papers cardstock for my base I wanted a quilted look so  I used the Elegance Collection Large Damask Flourish and Confetti folders and embossed a piece of the same white cardstock. I embossed 2 pieces with each folder. I then inked the pieces with pink, green and blue ink. After that I cut them into 2" squares. I then made the pattern alternating the colors. I also used the Large Damask Flourish folder and embossed 2 mats for my photos. I didn't ink those, I just left them white to show the detail.


I used the Daisy Nesting Dies to make 2 different type of gardenia blooms, you can see both in the photo below. I used Glitzin Glamour in gold in the centers of a couple and then used the smallest paper blooms for the other centers. I used the 2 next to smallest sizes for the blooms.


Here is a close-up of both types. I just hand cut the little leaves from some green cardstock and inked them.

I used a pink Zig marker to do some "faux" stitching around the mats and journaling spots. The wording is just some older rub-ons that I had in my stash.


I added a scallop border of pink and white with 2 sizes of the Scallop Oval Nesting Dies cut in half. I placed them beside my tri-colored ribbon. I then placed the self adhesive pearls in pink blush in the center of each scallop.

This is another close-up showing the blooms and leaves. These blooms were really easy and turned out pretty good! I'm not great at making my own blooms, but these dies work wonderfully!

I hope you enjoyed my post and I hope you check back regularly to see what great projects the design team has in store for you!!! Thanks so much for stopping by!

Couture Creations products used:
Nesting Dies Daisy
Nesting Dies Scallop Oval
Elegance Collection Large Damask Flourish folder
Elegance Collection Confetti folder
Self Adhesive pearls pink blush CO721997
Sponge dabbers CO723061
Glitzin Glamour gold CO721976
Foam Mounting tape 18mmx4m CO721963
Double sided tape 12mmx50m CO721984
Sharp Point Scissors CO721956
Cutting Mat CO721957


Thursday, April 18, 2013

Happy and Exciting News!!!


I am so excited to share the news that I was chosen as one of the new members of the  Green Tara Design Team!

Green Tara

I LOVE  Green Tara flowers and ribbons and can't wait to get started with the team! I'm so lucky to be a part of this talent:


  • Sandi Smith  Canada
  • Natalie May  Australia
  • Patti Hamill  USA
  • Returning DT Members
  • Mistra Hoolahan  Australia
  • Kim Price Australia
  • Jan Rankine Australia
  • Linda Thompson Australia
  • Rachael Funnell Australia
  • Marie-Josee Hamel Canada
  • Vicky Varvadouka  Greece
  • Di Garling Australia (DT Co ordinator)

Just had to share, I'm a total flower junkie, and this was a total dream come true for me!!! Thanks for stopping by and letting me share my news!! Congrats to Natalie and Sandi as new members also!!!!!


Tuesday, April 16, 2013

Mother's Day Card

I have a Mother's Day card to share with you today that's up on the Craft-Dee Bowz blog. You can check out the entire card there, but I have a couple of sneeks here! You can see the finished project here at the Craft-Dee Bowz blog

Here are a couple of sneeks:

First you see a close-up of my double-loop bow that I made using the Craft-Dee Bowz tool. I added a little stick pin from Nik Nax by Ariana's Etsy shop and some Prima blooms. The title is Anna Griffin Inc.


 Here you can see more of the layered title stickers from Anna Griffin, Inc. I used Prima Firefly papers for this also.
.
Thanks for stopping by, and please check out the entire project over at the Craft-Dee Bowz blog, we would really appreciate it!

Friday, April 5, 2013

April Moxxie Blog Hop!!!

All right, hockey moms! This one is for YOU!  Welcome to Moxxie's April Muse-A-Palooza Blog Hop!  We have a grungy, icy, rough, real hockey collection to share...and you could win the entire Hockey collection!  Check it out - the neutral black, white, and gray color scheme - with occasional pops of blood red (we are talking hockey, after all!) - will look great with your pictures no matter what color jersey your team is sporting!
The die cuts and stickers have customized quotes and expressions to help you capture the action on the ice!  To have a chance to win, you need to: 
  • Follow the hop through all eleven participating blogs, check out the beautiful work of the Moxxie Muses, and leave a comment for each of them. 
  • Comments will close at midnight CST on Tuesday, April 9th. 
  • Winner will be announced the next day on the Moxxie blog
  • International fans are welcomed to play along if they agree to pay shipping in the event of their win.
Ready to hop?!!  Here is your hop sequence...  on your mark, get set --- GO!
*******
*******

I don't know anything about hockey, nobody close by plays hockey, we live in the South, so it's not really cold enough here!!! So I did my page on the Great Wayne Gretzky!!!!

I kept it pretty basic, not much embellishing for a page like this, I thought it should be more graphic.

I did add some black hemp twine and a little faux stitching!

And a tiny little Tim Holtz clip!!! This is a really neat grungy collection, it could be used for anything masculine, not just hockey, there are enough generic patterns on the back!


Thanks so much for stopping by and I hope you find some time to play today!
Moxxie www.gotmoxxie.com

Wednesday, April 3, 2013

Craft-Dee Bowz Blog Hop

Hello! It's time for the second Blog Hop for Craft-Dee Bowz! We have some great Spring projects to share with you so we hope you hop along with us! You should have arrived here from the Craft-Dee Bowz Blog.

I've done two projects for this month using the beautiful ribbon, Prima butterflies and Prima paper! And of course the bows were made with my trusty Craft-Dee Bowz tool! The first project is a layout.


I used lots of Prima blooms, even some older ones that I had. I added some Ranger liquid pearls for the centers.

This is a close-up of the bow. I used a piece of each of the three colors of sheer ribbon, the pink, blue and teal, only one loop, but it makes a triple bow! And then I placed the butterfly on top!


I layered a couple of pieces of Prima chipboard and put a "3" on top for my three children. More Prima blooms here too.

For the next project, I did a card. I used a woven ribbon technique for a section on this card.. I just cut a piece of cardstock to the size I wanted and then did my ribbon weaving onto it, securing each end from behind. I added a bow using the pink and blue ribbons. I used the same Prima paepr and another butterfly.

 You can see the bow here. I used an Anna Griffin title sticker for this.

You can see a little more of the ribbon weaving here.

and here:

I hope you enjoyed my projects. Now your next stop on the hop will be Amber's Blog. Don't forget to check each one and thanks so much for stopping by!

Supplies used:
Pink, Blue and Teal sheer ribbon
Craft-Dee Bowz tool
Prima paper - 6x6 pad, Firefly
Prima butterflies - Mariposa
Anna Griffin title sticker
Kuretake Zig markers
Prima blooms

Monday, April 1, 2013

New Challenge Time at OUAS


It's time for a new challenge over at Once Upon A Sketch! I would like to invite everyone to come  and play along! It's a fantastic challenge and we have some AWESOME prizes to give away! Check it out here!


Theme:  Best day of your life

The best day of your life!!!!! Everyone has at least one or two! Tell us anything that you can relate this title to. 
Ideas for journalling: child's birth, wedding day, anniversary, meeting someone special, buying a new home, changing jobs, a holiday, a special celebration.. there is no right or wrong. Its YOUR day!

Your layout must incorporate this theme and the sketch below. 

Please make sure that we see some sort of journalling on your layouts and please tell us where your journalling is . You are allowed to journal in any language but please tell us where on your page we will find your journalling. Remember journalling has to be a bit more than a title, or a generic comment. Hidden journalling is perfectly fine.

 The journaling challenge for this is "The best day/days of my life". Which I would say would be the days I had my three children, but that's a pretty popular topic, so I decided to do a page about the day that my adoption was final. That was a very important day for me!! It shaped what I was to become! So proud to have been "chosen" by this awesome Daddy!!!


I used Imaginarium Designs chippies. I mixed two colors of Suzy West WOW Embossing Powders to use on them. I layered up some Prima chipboard pieces underneath.

This is also an Imaginarium Designs title, using the same mixed colors of embossing powder. Added some blooms of course!!!

More detail.

Here is my journaling! I added a tiny Tim Holtz clip also!!!


Don't forget to play along, and go check out all of the  beautiful projects done by our Design Team and guest designers!! Please visit their blogs, they would appreciate it!!!! Thanks so much for dropping by!!!